
Ingredients
- A Facebook Page
- Facebook Admin Access to the page
- A Website
- Website Admin Access
Directions
- Create a Facebook Pixel.
- Log in to Facebook, or to business.facebook.com
- Navigate to your Ads manager, or click here for a direct link.
- Choose the Ad account you wish to create the pixel for (if you have more than 1)
- Click 'Create A Pixel'
- Click 'Email Instructions to a Developer'.
- Enter your email address.
- Click 'Send' at the bottom of the page.
- We recommend doing this so that you have the code in your email for reference.
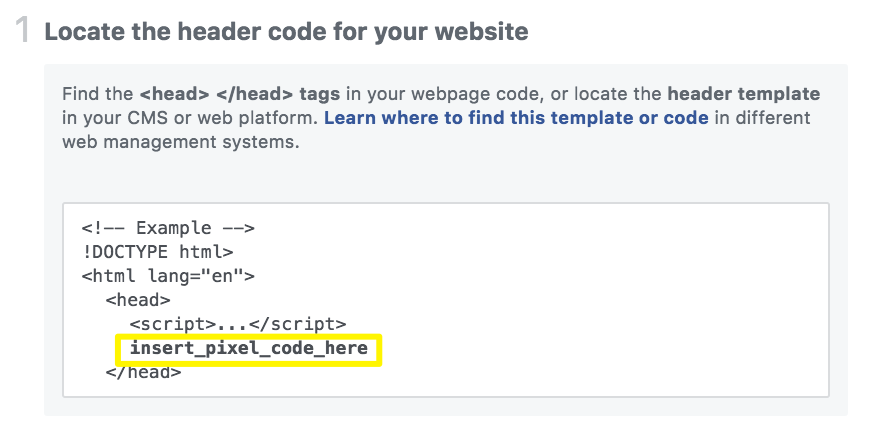
- Install Facebook pixel.
- You will be copying and pasting the pixel script from step 2 the email you received into the header of your website, before the tag. Don't worry, it's not as hard as it seems!
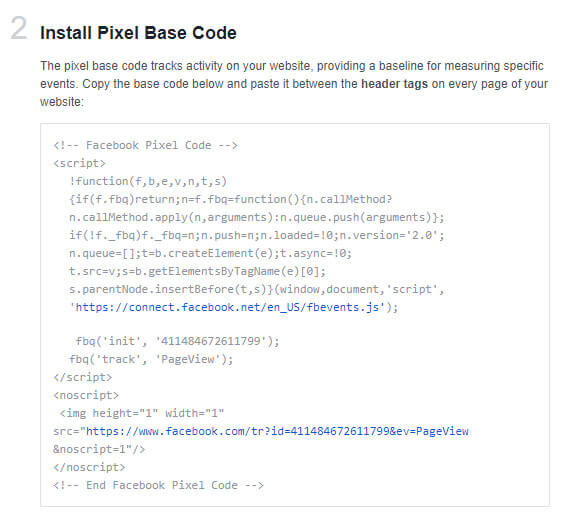
- Many modern content management systems have a field to paste the script into so you don't have to access the website code directly.
- Find specific instructions for your type of website below.
- You will be copying and pasting the pixel script from step 2 the email you received into the header of your website, before the tag. Don't worry, it's not as hard as it seems!
- Check for proper installation.
- Add the Pixel Helper to Chrome.
- Visit your website
- Click on the 3 vertical dots in the top right corner
- If properly installed you will see a blue icon.
Congratulations!
You’ve now successfully installed the Facebook Pixel and are gathering data from the visitors to your website.
Instructions for common website types
Instasite
- Login to your Instasite editor
- Click on Settings
- Scroll down to Custom JS
- Paste the Facebook Pixel code into the box.
- Click Save.
- Click Publish at the top of the page.
WordPress
- Go to the ‘Plugins’ page of your WordPress site. Search for the plugin ‘Insert Headers and Footers’, or download from this link and install. Insert Headers and Footers
- After installing and activating the plugin, go to the ‘Settings » Insert Headers and Footers’ page.
- Paste your Facebook Pixel code in the header section and click on the save button to store your changes.
Weebly
- Log in to Weebly.
- Select the site where you want to add your pixel.
- Click Edit Site.
- Click Settings.
- Click SEO.
- Scroll down and paste your Facebook Pixel code in the Header Code section.
Note: If you already have code in this section for another site (like Google Analytics), just place your Facebook Pixel code before or after the code that’s already in this section.
Wix
- Sign in to your Wix account.
- Go to your Site Manager.
- Click ‘Tracking & Analytics’.
- Click ‘+ New Tool’ and select ‘Facebook Pixel’ from the dropdown.
- Enter your Facebook tracking ID from section 1 in the email sent from Facebook.
- Click ‘Apply’.
Squarespace
- Log into your Squarespace site.
- In the Home Menu, click ‘Settings’, then click ‘Advanced’, then click ‘Code Injection’.
- Copy and paste the header code snippet into the Header field.
- In the header code, replace insert_pixel_code_here with the entire pixel code you copied.
- Click Save.
GoDaddy GoCentral
-
- Log in to your Website Builder account.
- Click ‘Edit Site’.
- Click the three-bar icon in the top-right corner of your screen and select ‘Site Settings’.
- Select ‘Site-wide Code’.
- Paste the pixel code between the <head> tags.
- Click OK and close the Site Settings window.
- Click Publish.
SnapPages
- Copy the code provided by Facebook.
- Click ‘Code’ under the ‘Settings’ tab within your SnapPages account.
- Paste the code into the ‘Header Code’ field and click ‘save’.
Sitebuilder
-
- Go to ‘My Layouts’.
- Click on ‘Layouts’.
- Choose your layout.
- Paste the pixel code in the box labeled ‘Scripts’.
- Click ‘Confirm and save’.